
Why Use the Fortnox Integration?
Integrating Expense with Fortnox allows you to:
- 🔄 Automate accounting exports
- 📊 Transfer accounting entries directly to Fortnox
- 📎 Include receipt images with verifications
- ✅ Reduce manual bookkeeping
- 📁 Import cost centers and projects into Expense
- 🚀 Improve efficiency and data accuracy
Set Up the Fortnox Integration
Step 1 – Access Integration Settings
Navigate to:
Administration > Settings > Integrations
This section contains all available integrations and connection settings.
Step 2 – Add the Fortnox Integration
- Click Choose Integration
- Select Fortnox
- Click Add
✅ Fortnox is now added as an available integration.
Step 3 – Configure the Verification Series
Before activating the integration, specify which verification series should be used for accounting exports.
- Enter the desired verification series
- Click Save
Examples may include:
- A
- B
- EXP
👉 The appropriate series depends on your accounting setup in Fortnox.
Step 4 – Activate the Fortnox Integration
Navigate to:
Integrations > Activate Fortnox
Step-by-Step
- Click Activate Fortnox
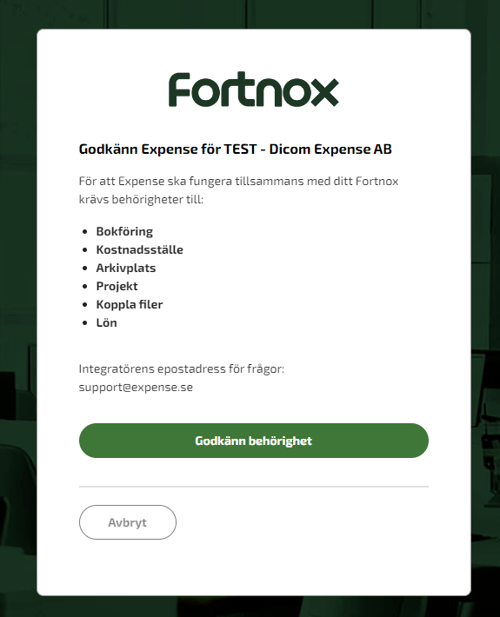
- Log in to your Fortnox account via the popup window
- Grant the required permissions
- Confirm the connection
✅ Expense is now connected to Fortnox.
Import Internal Accounts from Fortnox
Expense can automatically import internal account structures such as cost centers and projects directly from Fortnox.
Step-by-Step
- Navigate to:
Internal Accounts > Account Codes
- Click the Three Dots (⋮)
- Select:
Import Internal Account Codes from Fortnox
✅ Cost centers and available dimensions are imported automatically into Expense.
Important: Configure Dimension Types
For exports to work correctly, the imported dimensions must be assigned to the correct type.
Examples:
- 📁 Cost Center
- 📊 Project
- 🏢 Department
✅ Ensure the dimension type matches the intended accounting structure in Fortnox.
Once reports have been approved:
- Go to the export section
- Click Export
- Expense transfers the accounting data automatically
✅ Transactions are sent directly to Fortnox.
What Is Exported?
The Fortnox integration transfers:
- 📊 Accounting entries
- 📎 Receipt images
- 💰 Expense transactions
- 📁 Internal account information
- ✅ Verification data
The information appears in:
Fortnox > Verifications
Benefits of Automatic Fortnox Exports
⚡ Faster Accounting
Approved reports move directly into Fortnox.
✅ Reduced Manual Work
No need to manually upload accounting files.
📎 Receipt Attachments Included
Supporting documentation follows each verification automatically.
📊 Better Data Quality
Eliminates many common import and entry errors.
Fortnox License Requirements
The Fortnox user configuring the integration must have access to the appropriate Fortnox modules.
Required Licenses
- ✅ Accounting
- ✅ Archive
These permissions are required to authorize and manage the integration.
Payroll Processing
If employee reimbursements will be handled through payroll:
- ✅ Payroll license is also required in Fortnox
This ensures payroll-related exports can be processed correctly.
Troubleshooting the Integration
Unable to Activate Fortnox
Check that:
- ✅ You can log in to Fortnox
- ✅ You have the correct Fortnox permissions
- ✅ Popups are allowed in your browser
Internal Accounts Are Missing
Verify that:
- ✅ Cost centers or projects exist in Fortnox
- ✅ The import was completed successfully
- ✅ Dimension types have been configured correctly
Verifications Are Not Appearing
Review:
- ✅ Approval status of reports
- ✅ Export history in Expense
- ✅ Verification series settings
- ✅ Fortnox user permissions
💡 Best Practice Tips
- ✅ Import cost centers from Fortnox before inviting users
- 📊 Align dimension types with your accounting structure
- 📎 Verify receipt exports during testing
- 🔍 Test the integration with a small number of reports first
- 🔄 Regularly review synchronization settings
❓ Frequently Asked Questions (FAQ)
Can Expense transfer receipts to Fortnox?
Yes. Receipts are transferred together with accounting verifications.
Can I import projects and cost centers from Fortnox?
Yes. Internal account codes can be imported directly from Fortnox.
Does the approval process change after activating Fortnox?
No. Reports continue to follow the standard Expense approval workflow.
Which Fortnox licenses are required?
At minimum:
- Accounting
- Archive
A Payroll license is required if payroll-related processing is involved.
Where do exported reports appear in Fortnox?
Under Verifications.
✅ Summary
- 🔗 Connect Expense directly to Fortnox
- ⚙️ Configure the integration under Administration > Settings > Integrations
- 📁 Import cost centers and projects from Fortnox
- 📊 Export accounting entries and receipts automatically
- ✅ Reduce manual bookkeeping and improve accuracy
- 🚀 Streamline your accounting workflow with a fully integrated Expense and Fortnox setup