For Windows Users
Step 1 – Download PuTTY
- Visit www.putty.org
- Click Download PuTTY, or download it directly using the installation link provided by PuTTY.
- Install PuTTY on your computer.
✅ PuTTY and PuTTYgen are now available.
Step 2 – Generate an SSH Key Pair
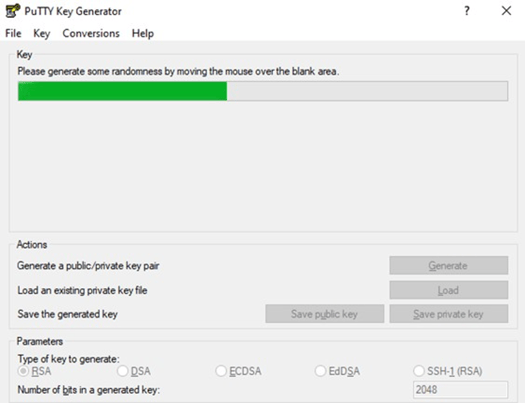
- Open PuTTYgen.
- Click Generate.
- Move your mouse around the empty space until the progress bar is completed.
✅ Your SSH key pair will be generated.
Step 3 – Save the Public Key
- Click Save Public Key.
- Save the file as: pub_key
- If prompted for a passphrase, leave it empty.
✅ The public key is ready to be uploaded to Expense.
Step 4 – Save the Private Key
- Click Save Private Key.
- Save the file as:
✅ Keep this file secure; it will be required when connecting to the SFTP server.
Step 5 – Upload the Public Key
- Return to the Expense web portal.
- Select Upload Public Key.
- Upload the file you saved as pub_key.
✅ Your key is now registered in Expense.
For Apple macOS and Linux Users
Step 1 – Open Terminal
Open the Terminal application.
Step 2 – Generate an SSH Key Pair
Run the following command:
ssh-keygen -t rsa -b 4096 -C "your-email@example.com"
Replace the email address with your own email address.
Step 3 – Choose a Storage Location
Select the folder where you want to save the keys.
✅ The key files will be generated in the selected location.
Step 4 – Leave the Passphrase Empty
When prompted for a passphrase:
- Press Enter
- Press Enter again
✅ No passphrase will be assigned.
Step 5 – Upload the Public Key
Locate the public key file:
Upload this file using the Expense web portal.
✅ The public key is ready for use.
Upload the Public Key in the Expense Web Portal
Step 1 – Enter a Key Title
Provide a descriptive name for the key.
Example:
Step 2 – Upload the File
- Select the public key file.
- Click Import.
✅ The key will be registered in Expense.
Step 3 – Verify the Upload
Once the upload is successful:
✅ Your SFTP account is ready for testing.
Test the Configuration
Step 1 – Record Connection Details
Note the following information:
- Account Name
- Host Name
- FTP/SFTP Port
✅ You will need these details when connecting.
Step 2 – Download an SFTP Client
We recommend using FileZilla.
Download FileZilla here:
https://filezilla-project.org/download.php?show_all=1
✅ Install FileZilla on your computer.
Step 3 – Open Site Manager
- Launch FileZilla.
- Open:
Site Manager
or navigate to:
File > Site Manager
✅ Create a new connection.
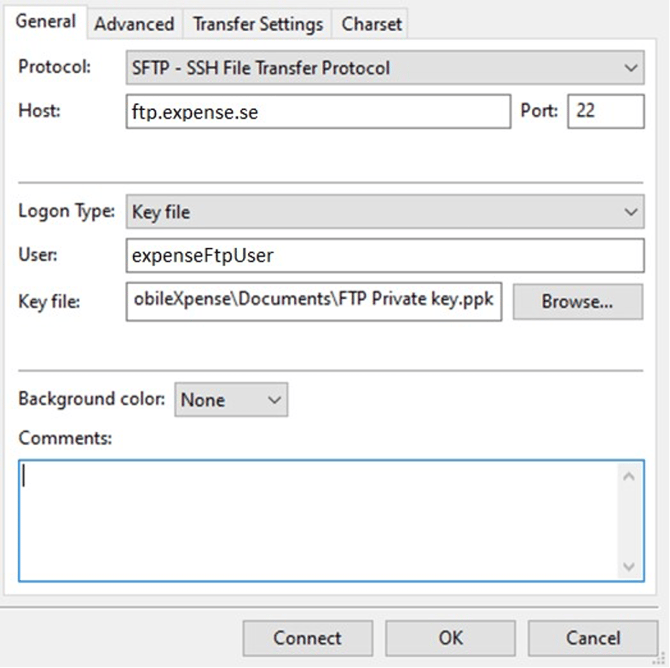
Step 4 – Configure the Connection
- Enter the server details provided by Expense.
- Select:
Logon Type: Key File
- Browse to and select your private key file:
- Complete the remaining connection settings.
✅ The SFTP connection is configured.
Step 5 – Connect to the Server
- Click Connect.
If the connection is successful, you should receive a message similar to:
✅ Your SFTP account is now active and ready to use.
💡 Best Practice Tips
- 🔒 Keep your private key secure and never share it.
- 📁 Store backup copies of your keys in a secure location.
- ✅ Use descriptive key names when uploading public keys.
- 🔄 Test the connection immediately after creating the account.
- 🖥️ Use FileZilla or another SFTP client that supports SSH key authentication.
Frequently Asked Questions (FAQ)
What is the difference between the public and private key?
The public key is uploaded to Expense. The private key remains on your computer and is used to authenticate your connection.
Can I use another SFTP client instead of FileZilla?
Yes. Any SFTP client that supports SSH key authentication can be used.
Should I set a passphrase on my key?
For Expense SFTP integrations, leave the passphrase empty unless your organization's security policy requires one.
Which file should I upload to Expense?
Upload the public key file:
or
depending on your operating system.
What if the connection test fails?
Verify that:
- The correct private key is selected
- The host, username, and port are correct
- The public key has been uploaded successfully
Summary
- 🔑 Generate an SSH key pair
- 📤 Upload the public key to Expense
- 🔒 Store the private key securely
- 🌐 Configure your SFTP client using the provided connection details
- ✅ Test the connection using FileZilla or another SFTP client
- 🚀 Securely transfer files between your systems and Expense using SFTP authentication